 I finally took the time to make a diaper tricycle and take pictures of the steps along the way.
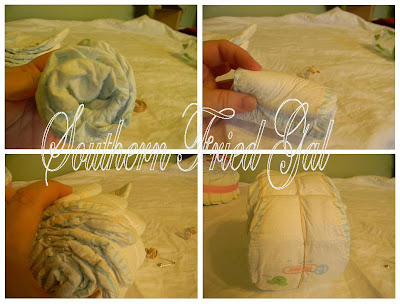
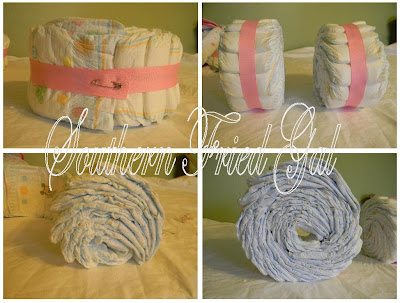
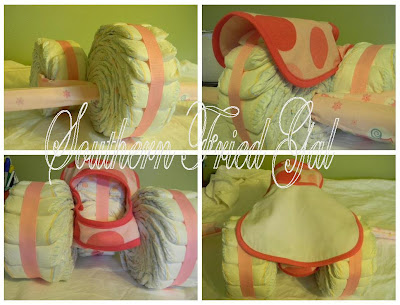
To begin, I used 15 (size one or two) diapers for each back wheel and 25 diapers for the front wheel. Roll one diaper up into a fairly tight roll. Then start layering the other diapers around the spacing the ends out to make the tread for the wheels. Secure with rubber bands to hold in place.
I have done this enough to have the top of the last diaper meet the bottom of a previous one. As a type A gal, I like that the orderliness of this. Use as many rubber bands as you need to keep the circle going. I think I use about three. In the end you will cover them up with pretty ribbon.
There may be a better way to secure the ribbon around each wheel but I prefer to do so with a safety pin. I personally can never find one when I need one around here so I like the usability of the pins in the final product. The wheels will be strategically placed to hide all our secrets. Rinse and repeat with the 25 diapers to create the front wheel. Once the wheels are assembled, poke your fingers through to create an opening.
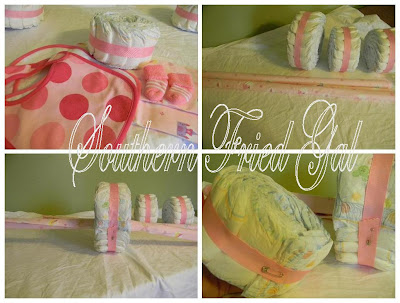
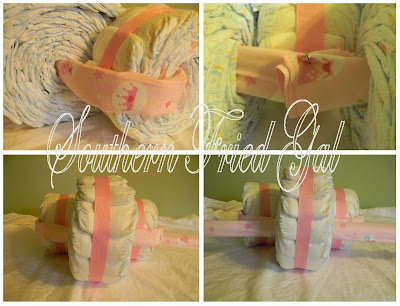
I think the most fun part of this project is mixing and matching the accessories to create the trike. You will need two cotton receiving blankets (the stiffer the better), two bibs, one bottle, and a pair of coordinating socks. Individually roll up the blankets as tightly as you can. These will become what holds the trike together. Then insert one blanket through the front wheel.
Place the back wheels on either side of the front wheel. I like for the treads of my back wheel to face backwards and the front to run forward. Thread the blanket from the front wheel into the outside back wheels. Pull together tightly and secure (again I use a safety pin). Then I slide the blanket around so the pinned part is hidden inside one of the back wheels.
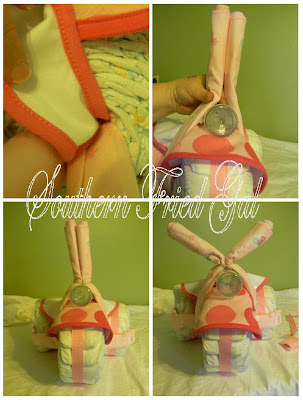
Next thread the other rolled blanket evenly through the front wheel. Place a bib over the front wheel to create the fender. I like to tuck my bib around to the back for added interest. Place the other bib over the back of the trike to create the seat.
If the bib is large enough I like to fasten the seat bib through the front wheel . If not I just tuck so that it is secure and orderly. Place a bottle on top of the front bib, pull up the second blanket to create bunny ears and secure with a rubber band. Work with the blanket to get the handles just right. It may take a bit for gravity to help the handle bars lay down the way you want them.
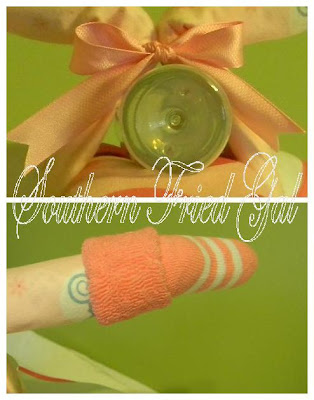
Finally add the finishing touches! Conceal the rubber band at the handle bars with a ribbon tied into a pretty bow. Use the socks on each end of the handle bars to create grippers (aren’t they adorable?).
Then fluff and adjust until you get it just the way you want it.
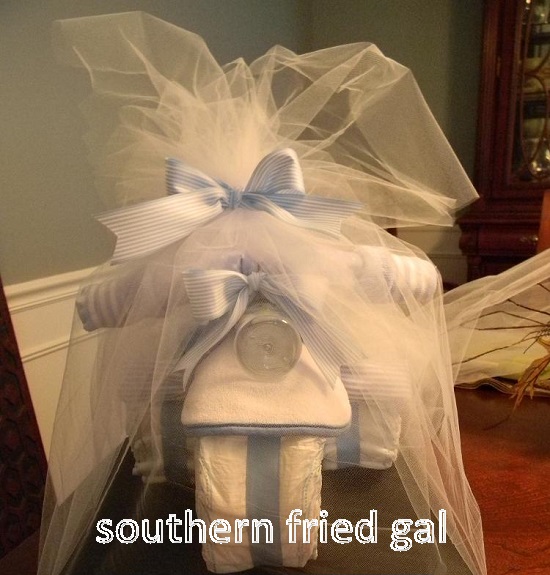
For a beautiful presentation, wrap your diaper tricycle with tulle and tie with a coordinating ribbon. You’ll have everyone oohing and ahhing over your skills at the shower!
I hope this helps you create gifts for your friends and family. If you decide to craft one (or twelve) please shoot me a picture of how it turns out! If you are crafty challenged or just don’t have the time for a project like this you can order one from me and I’ll ship to you or the gift recipient!
Happy crafting!
~Southern Fried Gal
Joining the fun at these linky parties…






March 15, 2011
Fantastic tutorial! Cute as a sweet new baby,Would be a great gift for baby shower just brilliant!
March 15, 2011
That beats the diaper cake hands down! LOL – Karen
March 17, 2011
This is adorable~ I’m going to have to bookmark this for the next baby shower I give.
March 18, 2011
This is the cutest thing!!
March 28, 2011
Oh My Gosh! That’s amazing! Thanks for sharing ~ please stop by sometime!
March 31, 2011
holy cow! that is like. THE cutest thing ever! totally puts those diaper cakes to shame! definetely bookmarking this for later use!
thank you SO much for sharing!
April 12, 2011
This is absolutely adorable!! I have never seen this before, thanks for sharing the tutorial!!
May 20, 2011
What a fantastic spin on the diaper cake! I’m featuring this in my Friday Favorites this week!
May 25, 2011
So incredibly clever!!
September 12, 2011
Thank you so much for this tutorial. I made it this past weekend and everyone fell in love with. It was exactly what I was looking for.
I just had to share this with my readers!
October 23, 2011
This was so much fun to make! Thanks for posting such a wonderful tutorial! Mine turned out really cute and I also made a wagon to attach to the back of it with the baby’s name on it. I know it will be a great hit at the shower!
Mrs. T. Jackson
Florence, SC
March 14, 2014
Oh my gosh! I’m going to a baby shower this weekend a wagon would be sooo cool!!
January 13, 2012
Thank you so much for posting the tutorial! My sister gave birth to a baby boy this morning, tonight the diaper tricycle is standing proud on my dining room table, will deliver it tomorrow!
January 21, 2012
I just made one of these this morning…..it is so darn cute, I can’t wait for the baby shower to display it!
February 10, 2012
Great tutorial! Just finished making it for a baby shower tomorrow….hope the snow storm doesn’t cancel the shower. It is adorable on the computer monitor, but soooo much cuter in person!! Thank you!!!
February 10, 2012
Yay to everyone who has had success with this tutorial. Please send me a picture of your finished project so I can share in a gallery to inspire others!
February 11, 2012
Thank you so much for these great DIY instructions!! I just made one and it looks great!!
March 7, 2012
Many thanks for the tut! Made one and looks very cute:-))
March 29, 2012
Great tutorial! This was the first time I have ever attempted anything like this! Here is a link to my finished product.
https://picasaweb.google.com/aimeep421/DiaperTricycle?authuser=0&authkey=Gv1sRgCLfW4_-h85TmhgE&feat=directlink
March 31, 2012
I loved your tutorial on the diaper trike! I made one just last week and everyone loved it! I loved the simple instrucrions so much that I posted a link to them on my blog http://www.beeintentional.blogger.com
Thanks!
April 12, 2012
I used your tutorial today! Here’s a link to my blog for pictures. My friend and I loved your tutorial!
http://scherzfamily.wordpress.com/2012/04/12/diaper-tricycle-and-a-clean-kitchen/
Thanks again!
Shannon
April 26, 2012
i made one but it is a 2 wheeler, i couldn’t get the front big wheel to stay together i will send a pic of mine
May 7, 2012
I have a diaper shower to go to this weekend and this is just what I needed! It seems simple enough! Thanks for the tutorial!
June 29, 2012
This is fabulous, easy to understand steps, thank you
July 22, 2012
So I’ve made the motorcycle version of this and thought that this would be the same. It was. This time around, however, I was struggling with the wheels. I used ribbon originally to secure the wheels, but the darn stuff kept popping loose. I used rubber bands, but they kept snapping. Eventually I laced several rubber bands together and then reinforced it with ribbon. I’m not sure what I’m doing wrong. But after a few four letter words, it’s ready for the baby shower tomorrow!
Thanks for sharing the tutorial. Too many people get weird and proprietary over this kind of thing – I’m glad you’re willing to share!
July 26, 2012
Awesome tricycle cake! I always wanted to make one and I’ve never had.
August 11, 2012
This is an awesome creation and a great tutorial. Thank you for sharing! I have a baby shower coming after Christmas, if I can pull it off, this will certainly impress the mommy-to-be!
September 14, 2012
Hi! I have a question: what would be the ideal dimensions for the blankets to make sure that they are neither too big nor too small to get around the whole thing?
Thank you!
September 19, 2012
I just used this tutorial to make a trike for a friend of mine. I am hosting her shower this weekend, and it came out great!! It is an absolutely adorable idea! Thank you much for the tutorial! It was super easy to follow!
October 16, 2012
I used your tutorial for making the diaper trike and it turned out just beautiful. I used a sippy cup instead of the bottle for the headlight and used the handles of the sippy cup to feed the sides of the baby blanket thru for the front wheel. I also used a onesie folded into a triangle for the seat of the trike. I got several rave reviews of my creation and the expectant parents just loved it. I will definitely be using this idea again in the future. Thank you so much for the very easy instructions!
November 24, 2012
Thank you for such great instructions! I made one for my best friends shower. Took me about an hour and was very easy and fun to make! I had a little trouble with the handlebars but out a chop stick behind it to hold it up! Thanks again, it is so cute!!
December 30, 2012
I have two great-grandbabies due in 2013. I had seen pictures of this tricycle, but yours is the first with instructions. Thank you so much – you made my day.
February 7, 2013
My grandson is due in a few weeks & this is such an. ADORABLE idea!! More clever than a diaper cake!
May 21, 2013
I have made several of these and have one consistent problem… my handle bars are droopy. How did you get your blanket to stay so ‘erect’? Thanks.
August 2, 2013
This was such a. great tutorial!! Thanks so much! I do have a quick question.. The tires on my tricycle look a little “flat” any suggestions on how to fix?